1. Heather Lomas Post Production Workspace – Premiere Elements
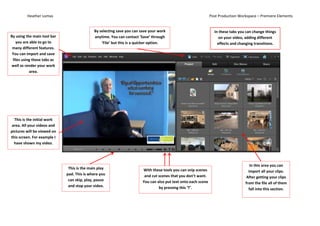
In this area you can
import all your clips.
After getting your clips
from the file all of them
fall into this section.
This is the main play
pad. This is where you
can skip, play, pause
and stop your video.
By using the main tool bar
you are able to go to
many different features.
You can import and save
files using these tabs as
well as render your work
area.
This is the initial work
area. All your videos and
pictures will be viewed on
this screen. For example I
have shown my video.
With these tools you can snip scenes
and cut scenes that you don’t want.
You can also put text onto each scene
by pressing this ‘T’.
By selecting save you can save your work
anytime. You can contact ‘Save’ through
‘File’ but this is a quicker option.
In these tabs you can change things
on your video, adding different
effects and changing transitions.
2. Heather Lomas Post Production Workspace – Premiere Elements
By using this slider you can change how
zoomed you want the timeline to be. If
you’re cutting a scene you need to see
right into the timescales.
You can see all my clips have been
places into the timeline. This is
where any clip goes onto the
timeline, including music etc.
You can switch from both timeline
to scene line. Scene line often
helps when adding in transitions.
As you can see there is a range of different layers
that you can put many different features onto your
video. If you want a logo like I did I had that running
all through the video on ‘Video 3’.
The yellow on each scene is the
volume of each scene. You can
change these through key frames
from the three buttons under the
soundtrack button.