Use of FIDO in the Payments and Identity Landscape: FIDO Paris Seminar.pptx
Putting dialog boxes to work
1. Putting Dialog Boxes to Work
We will work with OpenFile, SaveFile, Font and Color Dialog's in this section. From the toolbox
drag a MainMenu component, RichTextBox control, Button Control, OpenFileDialog,
SaveFileDialog, FontDialog and ColorDialog onto the form. The sample code demonstrated
below allows you to select a file to be opened and displays it in the RichTextBox with
OpenFileDialog, allows you to save the text you enter in the RichTextBox to a location using the
SaveFileDialog, allows you to select a font and applies the selected font to text in the RTB
using FontDialog and allows you to select a color and applies the color to text in the RTB using
the ColorDialog. Select the MainMenu component and in the "Type Here" part of the MainMenu
type File and using the down arrow keys on the keyboard start typing Open, Save, SelectFont
and SelectColor under the File menu. It should look like this: File-> Open, Save, SelectFont,
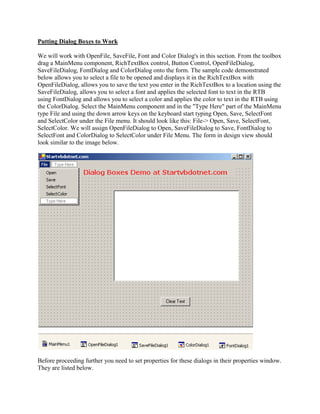
SelectColor. We will assign OpenFileDialog to Open, SaveFileDialog to Save, FontDialog to
SelectFont and ColorDialog to SelectColor under File Menu. The form in design view should
look similar to the image below.
Before proceeding further you need to set properties for these dialogs in their properties window.
They are listed below.
2. For OpenFileDialog1, set the DefaultExt property to txt so that it opens text files, InitialDirectory
property to C:, RestoreDirectory propery to True and the Text property to Open File From.
For SaveFileDialog1, set the DefaultExt property to txt so that it saves files in text format,
InitialDirectory property to C: so that when you save a file, it first provides C: drive as the choice
of location, OverwritePrompt property to False, RestoreDirectory propery to True and the Text
property to Save File In.
For FontDialog1, set the AllowSimulations, AllowVectorFonts, AllowverticalFonts properties to
false, MaxSize to 50, MinSize to 5 and ShowApply and ShowColor properties to True.
For ColorDialog1, set AnyColor and SolidColorOnly properties to True.
Code
Imports System.IO
Public Class Form1 Inherits System.Windows.Forms.Form
#Region " Windows Form Designer generated code "
#End Region
Private Sub Button1_Click(ByVal sender As System.Object, ByVal e As_
System.EventArgs) Handles Button1.Click
RichTextBox1.Text = " "
'clears the text in richtextbox
End Sub
Private FileName As String
'declaring filename that will be selected
Dim sr As StreamReader
'streamreader is used to read text
Private Sub MenuItem2_Click(ByVal sender As System.Object, ByVal e
As_
System.EventArgs) Handles MenuItem2.Click
Try
With OpenFileDialog1
'With statement is used to execute statements using a particular object, here,_
'OpenFileDialog1
.Filter = "Text files (*.txt)|*.txt|" & "All files|*.*"
'setting filters so that Text files and All Files choice appears in the Files of
Type box
'in the dialog
If .ShowDialog() = DialogResult.OK Then
'showDialog method makes the dialog box visible at run time
3. FileName = .FileName
sr = New StreamReader(.OpenFile)
'using streamreader to read the opened text file
RichTextBox1.Text = sr.ReadToEnd()
'displaying text from streamreader in richtextbox
End If
End With
Catch es As Exception
MessageBox.Show(es.Message)
Finally
If Not (sr Is Nothing) Then
sr.Close()
End If
End Try
End Sub
Private Sub MenuItem3_Click(ByVal sender As System.Object, ByVal e
As_
System.EventArgs) Handles MenuItem3.Click
Dim sw As StreamWriter
'streamwriter is used to write text
Try
With SaveFileDialog1
.FileName = FileName
.Filter = "Text files (*.txt)|*.txt|" & "All files|*.*"
If .ShowDialog() = DialogResult.OK Then
FileName = .FileName
sw = New StreamWriter(FileName)
'using streamwriter to write text from richtextbox and saving it
sw.Write(RichTextBox1.Text)
End If
End With
Catch es As Exception
MessageBox.Show(es.Message)
Finally
If Not (sw Is Nothing) Then
sw.Close()
End If
End Try
End Sub
Private Sub MenuItem4_Click(ByVal sender As System.Object, ByVal e
As_
System.EventArgs) Handles MenuItem4.Click
Try
With FontDialog1
4. .Font = RichTextBox1.Font
'initializing the dialog box to match the font used in the richtextbox
.Color = RichTextBox1.ForeColor
'default color is Black
If .ShowDialog = DialogResult.OK Then
setFont()
'calling a method setFont() to set the selected font and color
End If
End With
Catch es As Exception
MessageBox.Show(es.Message)
End Try
End Sub
Private Sub setFont()
Try
With FontDialog1
RichTextBox1.Font = .Font
If .ShowColor Then
RichTextBox1.ForeColor = .Color
'setting the color
End If
End With
Catch ex As Exception
MessageBox.Show(ex.Message)
End Try
End Sub
Private Sub MenuItem5_Click(ByVal sender As System.Object, ByVal e As
_
System.EventArgs) Handles MenuItem5.Click
Static CustomColors() As Integer = {RGB(255, 0, 0), RGB(0, 255, 0),
RGB(0, 0, 255)}
'initializing CustomColors with an array of integers and putting Red, Green,
'and Blue in the custom colors section
Try
With ColorDialog1
.Color = RichTextBox1.ForeColor
'initializing the selected color to match the color currently used
'by the richtextbox's foreground color
.CustomColors = CustomColors
'filling custom colors on the dialog box with the array declared above
If .ShowDialog() = DialogResult.OK Then
RichTextBox1.ForeColor = .Color
CustomColors = .CustomColors
'Storing the custom colors to use again