How to connect bt pusher device to bt manager-server software using gprs for managerment remotely
•
0 likes•370 views

This document provides instructions for connecting a BT-Pusher device to a BTManagerServer software for remote management using GPRS. It involves: 1. Using BtspConfig software to set up network parameters for the BT-Pusher device including device name, count, IP address range, and server IP. 2. Configuring the BT-Pusher device network type as GPRS, entering the NetPoint and telephone number, and server IP address. 3. Saving the configuration to a USB flash drive and updating the BT-Pusher device by inserting the USB drive. 4. Connecting the BT-Pusher device to the BTManagerServer software via a GPRS modem for

Recommended
More Related Content
What's hot
Similar to How to connect bt pusher device to bt manager-server software using gprs for managerment remotely
Similar to How to connect bt pusher device to bt manager-server software using gprs for managerment remotely (20)
More from Devicegate Technology Co., Ltd.
More from Devicegate Technology Co., Ltd. (8)
Recently uploaded
Recently uploaded (20)
How to connect bt pusher device to bt manager-server software using gprs for managerment remotely
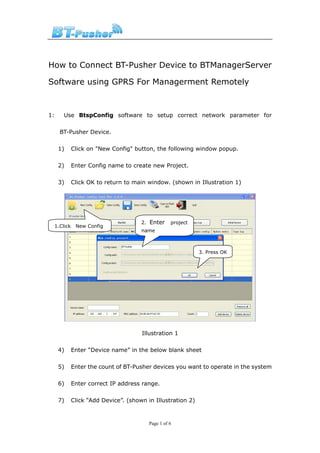
- 1. How to Connect BT-Pusher Device to BTManagerServer Software using GPRS For Managerment Remotely 1: Use BtspConfig software to setup correct network parameter for BT-Pusher Device. 1) Click on "New Config" button, the following window popup. 2) Enter Config name to create new Project. 3) Click OK to return to main window. (shown in Illustration 1) 2. Enter project 1.Click New Config name 3. Press OK Illustration 1 4) Enter “Device name” in the below blank sheet 5) Enter the count of BT-Pusher devices you want to operate in the system 6) Enter correct IP address range. 7) Click “Add Device”. (shown in Illustration 2) Page 1 of 6
- 2. 8) You will see a List of all devices 8. List of all devices 4.Enter 7. Click “Add 5.Enter DEVICE NAME Device”. DEVICE COUNT 6.Enter IP address Illustration 2 And network version BT-Pusher device requires some other Network parameters setup. 1) Clicking System Config button . 2) Under Network Type, select “GPRS” option. 3) Then Enter NetPoint and Telephone. Telephone and Netpoint are entered according to different countries where BT-Pusher is used. (Type “CMNET” in Netpoint editbox and “*99***1#” in Telephone editbox in China) 4) You need write your Server IP here,It is a internet IP address.Please ask your Network administrator for more detailed. 5) Click “OK” then system config updated information will be saved Page 2 of 6
- 3. 1.select “GPRS” 2. Enter NetPoint and Telephone 4. Press OK. 3. Enter server IP Illustration 3 6) Back to main window, you can see “Update Config” were selected 7) If everything has been confirmed correct, Press Save Config on the upper right corner. 8) Click “OK” in the pop-ups window of the “Save config done!” 9) Insert a USB device to the USB Port of your PC, then press Copy to Flash disk. 10) Select U-Disk you want to copy to in the pop-ups window,then click “OK” Page 3 of 6
- 4. 6. Press Save Config. 5.you can see “Update 7. Press OK Config” were selected Illustration 4 8. Press Copy to Flash disk 9. Press OK Illustration 5 11) If there is an old update file stored in this U-disk, you will see a dialog in Illustration 6 asking whether you would like to overwrite it. Page 4 of 6
- 5. Illustration 6 12) Press OK to Continue. 13) A dialog will appear saying "Copy to flash disk done!" Illustration 7 14) You can now remove the USB from your PC and insert it to the BT-Pusher USB port. 15) BT-Pusher device’s Green light flashes once every half a second, indicates device being updated: Page 5 of 6
- 6. 2: Connect BT-Pusher Device to BtManagerServer software 1) Please connect your GPRS MODEM to BT-Pusher Device USB port. 2) Plug power adapter (DC 12V)in the power interface. 4) Double-click to open BtManagerServer.exe software, and soon there is a device icon into a Green. Illustration 11 DeviceGate Technology Co.,Ltd Web http://www.bt-pusher.com/en Mail bt-pusher@devicegate.com devicegate@gmail.com Tel 0086-20-82317785, 0086-20-82317786 Fax 0086-20-62201638 Page 6 of 6