SlideShare a Scribd company logo
1 of 4
Download to read offline
2 0 0 0 / 1 0 0 0                                        M O D E L S
                              Installation Instructions
                                   & Recommended Pr ocedures

WARNING & BI-COLOR LED(S)
(MODELS: K40-2000/1000)
1. Consult with vehicle owner about LED location. For best visibility, choose a mounting location as close to the vehicle
   gauges as possible.
2. Check for proper clearance behind the area where the LED(s) will be installed (approximately 1”) and drill a 3/16” hole
   in the chosen location for the LED(s). K40-2000 models require the mounting of a second LED for rear radar warnings
   (see diagram A1).
3. If using the optional bi-color city/highway LED, choose a mounting location in the dashboard area that is below the
   driver's line of sight.
4. Check for proper clearance behind the area (approximately 1”), and drill a 19/64” hole for the bi-color LED location.
   Insert the LED into the drilled location and fasten it in place with the provided barrel fastener (see diagram A2).
5. Route all LED wires under the dash per diagram A3, and connect according to the separately enclosed block
   wiring diagram.


                                                                                       FRONT                                  REAR
                                                                                       ALERT                                  ALERT


                       1"                                       BARREL
                                                                          1"                                                   BI-COLOR
                                                               FASTENER                    PPER                     PPER
                                                                                      K/CO                      E/CO             L.E.D.
                                                                                 BLAC.D. WIRES              WHIT . WIRES
                                                                                  L.E                        L.E.D
                                                                                                                                      R            BL
                                                                                                                                    PE


                                                                                                                                     GRAY/SILVER
                                                                                                                                                     AC
                                                                                                                                  OP                   K
                                                                                                                                /C
 RED ALERT LED                          BI-COLOR LED                                   BLACK/SILVER        WHITE/SILVER      AY
                                                                                        L.E.D. WIRES       L.E.D. WIRES    GR


           DIAGRAM A1                                  DIAGRAM A2                                      DIAGRAM A3


PIEZO SPEAKERS                                                                 FRONT PIEZO
                                                                                SPEAKER
                                                                                                                                      REAR PIEZO
                                                                                                                                       SPEAKER

(MODELS: K40-2000/1000)                                                              LEFT AIR                                     RIGHT AIR
                                                                                      VENT                                          VENT

1. Use the provided double stick "O" ring tape to mount the piezo
   speakers.
2. For maximum audio output and concealment, mount the front
   piezo speaker in the driver's left air vent. Mount the rear piezo
   speaker in the driver's right air vent.                                              CL
                                                                                          EA
                                                                                            R                                ER
                                                                                           W /CO
3. Route the piezo speaker zip cord wires through or under the dash                         IR P
                                                                                              ES PE
                                                                                                                          ILV
                                                                                                                       N/S S
                                                                                                                     OW RE
                                                                                                   R               BR WI
   and connect according to the separately enclosed block wiring
   diagram (see diagram B1).                                                   CLEAR/SILVER
                                                                                  WIRES                                    BROWN/COPPER
                                                                                                                              WIRES


                                                                                                       DIAGRAM B1
WARNING POD(S)
(MODELS: K40-2000P/1000P)

NOTE:        For added installation convenience, Warning Pods contain both a warning LED and piezo speaker.


1. Consult with vehicle owner about Pod location. For best
   visibility, choose a mounting location as close to the vehi-
                                                                                       FRONT                                                   REAR
   cle's gauges as possible.                                                         WARNING POD                                            WARNING POD

2. Before mounting the Warning Pod(s), clean both the Pod
   surface and desired mounting location on the dash with
   isopropyl alcohol.
3. Position the Warning Pod(s) on the dash with the provided
   double stick "O" ring tape. K40-2000P models require the
   mounting of a second Pod for rear radar warnings.
4. Route the black cables from the Warning Pod(s) through or


                                                                                                         C
   under the dash per diagram C1, and connect according to


                                                                                                                                          B
                                                                                                    ER


                                                                                                          LE


                                                                                                                                  ER


                                                                                                                                           R
                                                                                                            A


                                                                                                                                            O
                                                                                                  PP


                                                                                                                                PP
                                                                                                             R


                                                                                                                                             W
                                                                                                              /S
                                                                                                CO


                                                                                                                               O


                                                                                                                                              N
   the separately enclosed block wiring diagram.


                                                                                                                             /C
                                                                                                                IL


                                                                                                                                               /S
                                                                                              K/


                                                                                                                  VE


                                                                                                                                                 IL
                                                                                                                           TE
                                                                                            AC


                                                                                                                                                   VE
                                                                                                                    R


                                                                                                                         HI


                                                                                                                                                     R
                                                                                          BL


                                                                                                                        W
                                                                                                BLACK/   CLEAR/               WHITE/      BROWN/
                                                                                                SILVER   COPPER               SILVER      COPPER


                                                                                                         DIAGRAM C1

FRONT RADAR RECEIVER
(ALL MODELS)

NOTE:        All radar receivers can be mounted behind plastic, rubber, or fiberglass up to 1/4” thick. Do not mount
             receivers behind metal, carbon fiber, or chromed plastic.

1. Choose a mounting location in
   the front of the vehicle that is not
   obstructed by any metal, carbon                         RADAR
                                                          RECEIVER
   fiber, or chromed plastic. The
   radar receiver can be mounted                               SELF-
                                                              TAPPING
   horizontally or vertically, provided                       SCREWS                                                                        RADAR
                                                                                                                                           RECEIVER
   the arrows are pointing forward,                      METAL
                                                        SUPPORT
                                                                                                                                             SELF-
                                                                                                                                            TAPPING
   towards the road ahead.                                                                                                                  SCREWS


2. Mount the radar receiver to the
   vehicle's structure using the
   supplied screws or wire tires
   (see diagram D1).                                                                  DIAGRAM D1


3. Connect the radar receiver to the 10’ black radar re-
   ceiver cable. Align slot on cable plug to the notch on                                         LOCKING RIB
                                                                                                                                                         FACTORY
   radar receiver socket, slide the locking ring forward over                                            LOCKING                                         GROMMET
   the socket, and turn ring clockwise 1/4 turn to engage                                                WINDOW

   safety lock (see diagram D2).                                                                               LOCKING
                                                                                                                 PIN                                      FRONT
                                                                                                                                                          RADAR
                                                                                                                                                         RECEIVER
4. Route and affix the radar receiver cable along the inner                                                     LOCKING                                   CABLE
                                                                                                                  RING
   fender in the engine compartment to the firewall using
                                                                         KEY
   the provided wire straps.                                            GUIDE   KEY WAY
                                                                                    LOCKING
5. Route the radar receiver cable through a factory rubber                            PIN
                                                                                                                                                         BR
                                                                                                                                          ITE


   grommet on the firewall and into the passenger com-
                                                                                                                                                           OW
                                                                                                                                                GREEN
                                                                                                                                        WH


                                                                                                                                                             N


   partment (see diagram D3). Connect wires according to
   the separately enclosed block wiring diagram.
                                                                                     DIAGRAM D2
                                                                                                                                       DIAGRAM D3
REAR RADAR RECEIVER
(MODELS: K40-2000/2000P)

NOTE:        All radar receivers can be mounted behind plastic, rubber, or fiberglass up to 1/4” thick. Do not mount
             behind metal, carbon fiber, or chromed plastic.

1. Choose a mounting location in the rear of the vehicle that is not
   obstructed by any metal, carbon fiber, or chromed plastic. The
   radar receiver can be mounted horizontally or vertically, provided
   the arrows are pointing to the rear, towards the road behind the
   vehicle.
2. Mount the radar receiver to the vehicle's structure using the sup-                                            METAL
                                                                                                                SUPPORT
   plied screws or wire tires (see diagram E1).
                                                                                                                RECEIVER
3. Connect the radar receiver to the 25’ black radar receiver cable.
                                                                                                                SCREWS
   Align slot on cable plug to the notch on radar receiver socket, slide
   the locking ring forward over the socket, and turn ring clockwise            REAR RADAR RECEIVER
                                                                               (BEHIND BUMPER COVER)
   1/4 turn to engage safety lock (see diagram E2).
4. Route the rear radar receiver cable into the trunk through a                                 DIAGRAM E1
   factory grommet.
                                                                                                                 LOCKING RIB
5. If a factory grommet is not available, use the provided strain relief:
                                                                                                                       LOCKING
   a. Choose a location in the trunk compartment as close to the                                                       WINDOW

      radar receiver as possible.                                                                                            LOCKING
                                                                                                                               PIN
   b. Drill a 1/2” hole into the chosen location for the strain relief.
                                                                                                                               LOCKING
                                                                                                                                 RING
                                                                                 KEY
                          Do not drill into the trunk until you know            GUIDE     KEY WAY
CAUTION!                  what is on both sides of the drilling area.                           LOCKING
                          Watch for cables, spare tires, and gas tank.                            PIN


   c. Install the strain relief and tighten the mounting nut securely
      (see diagram E3)                                                                          DIAGRAM E2
   d. Route the rear radar receiver cable through the strain relief,
      leaving a little slack in the receiver cable.                                     ROUTE THROUGH VEHICLE
                                                                                    MOUNTING NUT

   e. Tighten the waterproof gasket nut to create a water proof seal.           METAL
                                                                                TRUNK

   6. Route the rear radar receiver cable through the trunk, into the             WATERPROOF
                                                                                  GASKET MATERIAL
      passenger compartment along the driver's side, and under the
      dash. Connect wires according separately enclosed block                                                    TO RADAR DETECTOR

      wiring diagram.
                                                                                                DIAGRAM E3

VOLUME CONTROL MODULE
(all MODELS)
1. Choose a mounting location that's accessible to the driver in the dashboard area
   or in the vehicle's center console that will not obstruct or block any moving parts.
                                                                                                                      ON-OFF/
                                                                                                                       FILTER
                                                                                                                    ADJUSTMENT
                         Before drilling, make sure there is enough clearance for the                                 VOLUME

CAUTION! Volume Control Module behind the chosen mounting location                                                   CONTROL
                                                                                                                      MODULE
                         (approximately 3 1/4”).

2. Drill a 5/16” hole.                                                                                                                          MOUNTING
                                                                                                                                                  NUTS

3. Mount the Volume Control Module with the lock washer and nuts, and push the                           LOCK                            ON-OFF/FILTER
                                                                                                        WASHER                           ADJUSTMENT
   filter and volume adjustment knobs onto the module shaft (see diagram F1).                         VOLUME
                                                                                                                                             KNOB
                                                                                                      CONTROL
                                                                                                       KNOB
4. Route the Volume Control Module cable under the dash and connect wires
   according to the separately enclosed block wiring diagram.                                                        DIAGRAM F1
44506-1 7/07

More Related Content

Recently uploaded

ABOUT REGENERATIVE BRAKING SYSTEM ON AUTOMOBILES
ABOUT REGENERATIVE BRAKING SYSTEM ON AUTOMOBILESABOUT REGENERATIVE BRAKING SYSTEM ON AUTOMOBILES
ABOUT REGENERATIVE BRAKING SYSTEM ON AUTOMOBILESsriharshaganjam1
 
Control-Plan-Training.pptx for the Automotive standard AIAG
Control-Plan-Training.pptx for the Automotive standard AIAGControl-Plan-Training.pptx for the Automotive standard AIAG
Control-Plan-Training.pptx for the Automotive standard AIAGVikrantPawar37
 
Welcome to Auto Know University Orientation
Welcome to Auto Know University OrientationWelcome to Auto Know University Orientation
Welcome to Auto Know University Orientationxlr8sales
 
Human Resource Practices TATA MOTORS.pdf
Human Resource Practices TATA MOTORS.pdfHuman Resource Practices TATA MOTORS.pdf
Human Resource Practices TATA MOTORS.pdfAditiMishra247289
 
A Comprehensive Exploration of the Components and Parts Found in Diesel Engines
A Comprehensive Exploration of the Components and Parts Found in Diesel EnginesA Comprehensive Exploration of the Components and Parts Found in Diesel Engines
A Comprehensive Exploration of the Components and Parts Found in Diesel EnginesROJANE BERNAS, PhD.
 
怎么办理美国UCONN毕业证康涅狄格大学学位证书一手渠道
怎么办理美国UCONN毕业证康涅狄格大学学位证书一手渠道怎么办理美国UCONN毕业证康涅狄格大学学位证书一手渠道
怎么办理美国UCONN毕业证康涅狄格大学学位证书一手渠道7283h7lh
 
Can't Roll Up Your Audi A4 Power Window Let's Uncover the Issue!
Can't Roll Up Your Audi A4 Power Window Let's Uncover the Issue!Can't Roll Up Your Audi A4 Power Window Let's Uncover the Issue!
Can't Roll Up Your Audi A4 Power Window Let's Uncover the Issue!Mint Automotive
 
Mastering Mercedes Engine Care Top Tips for Rowlett, TX Residents
Mastering Mercedes Engine Care Top Tips for Rowlett, TX ResidentsMastering Mercedes Engine Care Top Tips for Rowlett, TX Residents
Mastering Mercedes Engine Care Top Tips for Rowlett, TX ResidentsRowlett Motorwerks
 
Lighting the Way Understanding Jaguar Car Check Engine Light Service
Lighting the Way Understanding Jaguar Car Check Engine Light ServiceLighting the Way Understanding Jaguar Car Check Engine Light Service
Lighting the Way Understanding Jaguar Car Check Engine Light ServiceImport Car Center
 
Pros and cons of buying used fleet vehicles.pptx
Pros and cons of buying used fleet vehicles.pptxPros and cons of buying used fleet vehicles.pptx
Pros and cons of buying used fleet vehicles.pptxjennifermiller8137
 

Recently uploaded (10)

ABOUT REGENERATIVE BRAKING SYSTEM ON AUTOMOBILES
ABOUT REGENERATIVE BRAKING SYSTEM ON AUTOMOBILESABOUT REGENERATIVE BRAKING SYSTEM ON AUTOMOBILES
ABOUT REGENERATIVE BRAKING SYSTEM ON AUTOMOBILES
 
Control-Plan-Training.pptx for the Automotive standard AIAG
Control-Plan-Training.pptx for the Automotive standard AIAGControl-Plan-Training.pptx for the Automotive standard AIAG
Control-Plan-Training.pptx for the Automotive standard AIAG
 
Welcome to Auto Know University Orientation
Welcome to Auto Know University OrientationWelcome to Auto Know University Orientation
Welcome to Auto Know University Orientation
 
Human Resource Practices TATA MOTORS.pdf
Human Resource Practices TATA MOTORS.pdfHuman Resource Practices TATA MOTORS.pdf
Human Resource Practices TATA MOTORS.pdf
 
A Comprehensive Exploration of the Components and Parts Found in Diesel Engines
A Comprehensive Exploration of the Components and Parts Found in Diesel EnginesA Comprehensive Exploration of the Components and Parts Found in Diesel Engines
A Comprehensive Exploration of the Components and Parts Found in Diesel Engines
 
怎么办理美国UCONN毕业证康涅狄格大学学位证书一手渠道
怎么办理美国UCONN毕业证康涅狄格大学学位证书一手渠道怎么办理美国UCONN毕业证康涅狄格大学学位证书一手渠道
怎么办理美国UCONN毕业证康涅狄格大学学位证书一手渠道
 
Can't Roll Up Your Audi A4 Power Window Let's Uncover the Issue!
Can't Roll Up Your Audi A4 Power Window Let's Uncover the Issue!Can't Roll Up Your Audi A4 Power Window Let's Uncover the Issue!
Can't Roll Up Your Audi A4 Power Window Let's Uncover the Issue!
 
Mastering Mercedes Engine Care Top Tips for Rowlett, TX Residents
Mastering Mercedes Engine Care Top Tips for Rowlett, TX ResidentsMastering Mercedes Engine Care Top Tips for Rowlett, TX Residents
Mastering Mercedes Engine Care Top Tips for Rowlett, TX Residents
 
Lighting the Way Understanding Jaguar Car Check Engine Light Service
Lighting the Way Understanding Jaguar Car Check Engine Light ServiceLighting the Way Understanding Jaguar Car Check Engine Light Service
Lighting the Way Understanding Jaguar Car Check Engine Light Service
 
Pros and cons of buying used fleet vehicles.pptx
Pros and cons of buying used fleet vehicles.pptxPros and cons of buying used fleet vehicles.pptx
Pros and cons of buying used fleet vehicles.pptx
 

Featured

AI Trends in Creative Operations 2024 by Artwork Flow.pdf
AI Trends in Creative Operations 2024 by Artwork Flow.pdfAI Trends in Creative Operations 2024 by Artwork Flow.pdf
AI Trends in Creative Operations 2024 by Artwork Flow.pdfmarketingartwork
 
PEPSICO Presentation to CAGNY Conference Feb 2024
PEPSICO Presentation to CAGNY Conference Feb 2024PEPSICO Presentation to CAGNY Conference Feb 2024
PEPSICO Presentation to CAGNY Conference Feb 2024Neil Kimberley
 
Content Methodology: A Best Practices Report (Webinar)
Content Methodology: A Best Practices Report (Webinar)Content Methodology: A Best Practices Report (Webinar)
Content Methodology: A Best Practices Report (Webinar)contently
 
How to Prepare For a Successful Job Search for 2024
How to Prepare For a Successful Job Search for 2024How to Prepare For a Successful Job Search for 2024
How to Prepare For a Successful Job Search for 2024Albert Qian
 
Social Media Marketing Trends 2024 // The Global Indie Insights
Social Media Marketing Trends 2024 // The Global Indie InsightsSocial Media Marketing Trends 2024 // The Global Indie Insights
Social Media Marketing Trends 2024 // The Global Indie InsightsKurio // The Social Media Age(ncy)
 
Trends In Paid Search: Navigating The Digital Landscape In 2024
Trends In Paid Search: Navigating The Digital Landscape In 2024Trends In Paid Search: Navigating The Digital Landscape In 2024
Trends In Paid Search: Navigating The Digital Landscape In 2024Search Engine Journal
 
5 Public speaking tips from TED - Visualized summary
5 Public speaking tips from TED - Visualized summary5 Public speaking tips from TED - Visualized summary
5 Public speaking tips from TED - Visualized summarySpeakerHub
 
ChatGPT and the Future of Work - Clark Boyd
ChatGPT and the Future of Work - Clark Boyd ChatGPT and the Future of Work - Clark Boyd
ChatGPT and the Future of Work - Clark Boyd Clark Boyd
 
Getting into the tech field. what next
Getting into the tech field. what next Getting into the tech field. what next
Getting into the tech field. what next Tessa Mero
 
Google's Just Not That Into You: Understanding Core Updates & Search Intent
Google's Just Not That Into You: Understanding Core Updates & Search IntentGoogle's Just Not That Into You: Understanding Core Updates & Search Intent
Google's Just Not That Into You: Understanding Core Updates & Search IntentLily Ray
 
Time Management & Productivity - Best Practices
Time Management & Productivity -  Best PracticesTime Management & Productivity -  Best Practices
Time Management & Productivity - Best PracticesVit Horky
 
The six step guide to practical project management
The six step guide to practical project managementThe six step guide to practical project management
The six step guide to practical project managementMindGenius
 
Beginners Guide to TikTok for Search - Rachel Pearson - We are Tilt __ Bright...
Beginners Guide to TikTok for Search - Rachel Pearson - We are Tilt __ Bright...Beginners Guide to TikTok for Search - Rachel Pearson - We are Tilt __ Bright...
Beginners Guide to TikTok for Search - Rachel Pearson - We are Tilt __ Bright...RachelPearson36
 
Unlocking the Power of ChatGPT and AI in Testing - A Real-World Look, present...
Unlocking the Power of ChatGPT and AI in Testing - A Real-World Look, present...Unlocking the Power of ChatGPT and AI in Testing - A Real-World Look, present...
Unlocking the Power of ChatGPT and AI in Testing - A Real-World Look, present...Applitools
 
12 Ways to Increase Your Influence at Work
12 Ways to Increase Your Influence at Work12 Ways to Increase Your Influence at Work
12 Ways to Increase Your Influence at WorkGetSmarter
 

Featured (20)

AI Trends in Creative Operations 2024 by Artwork Flow.pdf
AI Trends in Creative Operations 2024 by Artwork Flow.pdfAI Trends in Creative Operations 2024 by Artwork Flow.pdf
AI Trends in Creative Operations 2024 by Artwork Flow.pdf
 
Skeleton Culture Code
Skeleton Culture CodeSkeleton Culture Code
Skeleton Culture Code
 
PEPSICO Presentation to CAGNY Conference Feb 2024
PEPSICO Presentation to CAGNY Conference Feb 2024PEPSICO Presentation to CAGNY Conference Feb 2024
PEPSICO Presentation to CAGNY Conference Feb 2024
 
Content Methodology: A Best Practices Report (Webinar)
Content Methodology: A Best Practices Report (Webinar)Content Methodology: A Best Practices Report (Webinar)
Content Methodology: A Best Practices Report (Webinar)
 
How to Prepare For a Successful Job Search for 2024
How to Prepare For a Successful Job Search for 2024How to Prepare For a Successful Job Search for 2024
How to Prepare For a Successful Job Search for 2024
 
Social Media Marketing Trends 2024 // The Global Indie Insights
Social Media Marketing Trends 2024 // The Global Indie InsightsSocial Media Marketing Trends 2024 // The Global Indie Insights
Social Media Marketing Trends 2024 // The Global Indie Insights
 
Trends In Paid Search: Navigating The Digital Landscape In 2024
Trends In Paid Search: Navigating The Digital Landscape In 2024Trends In Paid Search: Navigating The Digital Landscape In 2024
Trends In Paid Search: Navigating The Digital Landscape In 2024
 
5 Public speaking tips from TED - Visualized summary
5 Public speaking tips from TED - Visualized summary5 Public speaking tips from TED - Visualized summary
5 Public speaking tips from TED - Visualized summary
 
ChatGPT and the Future of Work - Clark Boyd
ChatGPT and the Future of Work - Clark Boyd ChatGPT and the Future of Work - Clark Boyd
ChatGPT and the Future of Work - Clark Boyd
 
Getting into the tech field. what next
Getting into the tech field. what next Getting into the tech field. what next
Getting into the tech field. what next
 
Google's Just Not That Into You: Understanding Core Updates & Search Intent
Google's Just Not That Into You: Understanding Core Updates & Search IntentGoogle's Just Not That Into You: Understanding Core Updates & Search Intent
Google's Just Not That Into You: Understanding Core Updates & Search Intent
 
How to have difficult conversations
How to have difficult conversations How to have difficult conversations
How to have difficult conversations
 
Introduction to Data Science
Introduction to Data ScienceIntroduction to Data Science
Introduction to Data Science
 
Time Management & Productivity - Best Practices
Time Management & Productivity -  Best PracticesTime Management & Productivity -  Best Practices
Time Management & Productivity - Best Practices
 
The six step guide to practical project management
The six step guide to practical project managementThe six step guide to practical project management
The six step guide to practical project management
 
Beginners Guide to TikTok for Search - Rachel Pearson - We are Tilt __ Bright...
Beginners Guide to TikTok for Search - Rachel Pearson - We are Tilt __ Bright...Beginners Guide to TikTok for Search - Rachel Pearson - We are Tilt __ Bright...
Beginners Guide to TikTok for Search - Rachel Pearson - We are Tilt __ Bright...
 
Unlocking the Power of ChatGPT and AI in Testing - A Real-World Look, present...
Unlocking the Power of ChatGPT and AI in Testing - A Real-World Look, present...Unlocking the Power of ChatGPT and AI in Testing - A Real-World Look, present...
Unlocking the Power of ChatGPT and AI in Testing - A Real-World Look, present...
 
12 Ways to Increase Your Influence at Work
12 Ways to Increase Your Influence at Work12 Ways to Increase Your Influence at Work
12 Ways to Increase Your Influence at Work
 
ChatGPT webinar slides
ChatGPT webinar slidesChatGPT webinar slides
ChatGPT webinar slides
 
More than Just Lines on a Map: Best Practices for U.S Bike Routes
More than Just Lines on a Map: Best Practices for U.S Bike RoutesMore than Just Lines on a Map: Best Practices for U.S Bike Routes
More than Just Lines on a Map: Best Practices for U.S Bike Routes
 

1000 2000 Install Guide

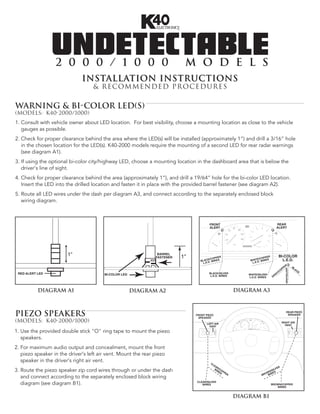
  • 1. 2 0 0 0 / 1 0 0 0 M O D E L S Installation Instructions & Recommended Pr ocedures WARNING & BI-COLOR LED(S) (MODELS: K40-2000/1000) 1. Consult with vehicle owner about LED location. For best visibility, choose a mounting location as close to the vehicle gauges as possible. 2. Check for proper clearance behind the area where the LED(s) will be installed (approximately 1”) and drill a 3/16” hole in the chosen location for the LED(s). K40-2000 models require the mounting of a second LED for rear radar warnings (see diagram A1). 3. If using the optional bi-color city/highway LED, choose a mounting location in the dashboard area that is below the driver's line of sight. 4. Check for proper clearance behind the area (approximately 1”), and drill a 19/64” hole for the bi-color LED location. Insert the LED into the drilled location and fasten it in place with the provided barrel fastener (see diagram A2). 5. Route all LED wires under the dash per diagram A3, and connect according to the separately enclosed block wiring diagram. FRONT REAR ALERT ALERT 1" BARREL 1" BI-COLOR FASTENER PPER PPER K/CO E/CO L.E.D. BLAC.D. WIRES WHIT . WIRES L.E L.E.D R BL PE GRAY/SILVER AC OP K /C RED ALERT LED BI-COLOR LED BLACK/SILVER WHITE/SILVER AY L.E.D. WIRES L.E.D. WIRES GR DIAGRAM A1 DIAGRAM A2 DIAGRAM A3 PIEZO SPEAKERS FRONT PIEZO SPEAKER REAR PIEZO SPEAKER (MODELS: K40-2000/1000) LEFT AIR RIGHT AIR VENT VENT 1. Use the provided double stick "O" ring tape to mount the piezo speakers. 2. For maximum audio output and concealment, mount the front piezo speaker in the driver's left air vent. Mount the rear piezo speaker in the driver's right air vent. CL EA R ER W /CO 3. Route the piezo speaker zip cord wires through or under the dash IR P ES PE ILV N/S S OW RE R BR WI and connect according to the separately enclosed block wiring diagram (see diagram B1). CLEAR/SILVER WIRES BROWN/COPPER WIRES DIAGRAM B1
  • 2. WARNING POD(S) (MODELS: K40-2000P/1000P) NOTE: For added installation convenience, Warning Pods contain both a warning LED and piezo speaker. 1. Consult with vehicle owner about Pod location. For best visibility, choose a mounting location as close to the vehi- FRONT REAR cle's gauges as possible. WARNING POD WARNING POD 2. Before mounting the Warning Pod(s), clean both the Pod surface and desired mounting location on the dash with isopropyl alcohol. 3. Position the Warning Pod(s) on the dash with the provided double stick "O" ring tape. K40-2000P models require the mounting of a second Pod for rear radar warnings. 4. Route the black cables from the Warning Pod(s) through or C under the dash per diagram C1, and connect according to B ER LE ER R A O PP PP R W /S CO O N the separately enclosed block wiring diagram. /C IL /S K/ VE IL TE AC VE R HI R BL W BLACK/ CLEAR/ WHITE/ BROWN/ SILVER COPPER SILVER COPPER DIAGRAM C1 FRONT RADAR RECEIVER (ALL MODELS) NOTE: All radar receivers can be mounted behind plastic, rubber, or fiberglass up to 1/4” thick. Do not mount receivers behind metal, carbon fiber, or chromed plastic. 1. Choose a mounting location in the front of the vehicle that is not obstructed by any metal, carbon RADAR RECEIVER fiber, or chromed plastic. The radar receiver can be mounted SELF- TAPPING horizontally or vertically, provided SCREWS RADAR RECEIVER the arrows are pointing forward, METAL SUPPORT SELF- TAPPING towards the road ahead. SCREWS 2. Mount the radar receiver to the vehicle's structure using the supplied screws or wire tires (see diagram D1). DIAGRAM D1 3. Connect the radar receiver to the 10’ black radar re- ceiver cable. Align slot on cable plug to the notch on LOCKING RIB FACTORY radar receiver socket, slide the locking ring forward over LOCKING GROMMET the socket, and turn ring clockwise 1/4 turn to engage WINDOW safety lock (see diagram D2). LOCKING PIN FRONT RADAR RECEIVER 4. Route and affix the radar receiver cable along the inner LOCKING CABLE RING fender in the engine compartment to the firewall using KEY the provided wire straps. GUIDE KEY WAY LOCKING 5. Route the radar receiver cable through a factory rubber PIN BR ITE grommet on the firewall and into the passenger com- OW GREEN WH N partment (see diagram D3). Connect wires according to the separately enclosed block wiring diagram. DIAGRAM D2 DIAGRAM D3
  • 3. REAR RADAR RECEIVER (MODELS: K40-2000/2000P) NOTE: All radar receivers can be mounted behind plastic, rubber, or fiberglass up to 1/4” thick. Do not mount behind metal, carbon fiber, or chromed plastic. 1. Choose a mounting location in the rear of the vehicle that is not obstructed by any metal, carbon fiber, or chromed plastic. The radar receiver can be mounted horizontally or vertically, provided the arrows are pointing to the rear, towards the road behind the vehicle. 2. Mount the radar receiver to the vehicle's structure using the sup- METAL SUPPORT plied screws or wire tires (see diagram E1). RECEIVER 3. Connect the radar receiver to the 25’ black radar receiver cable. SCREWS Align slot on cable plug to the notch on radar receiver socket, slide the locking ring forward over the socket, and turn ring clockwise REAR RADAR RECEIVER (BEHIND BUMPER COVER) 1/4 turn to engage safety lock (see diagram E2). 4. Route the rear radar receiver cable into the trunk through a DIAGRAM E1 factory grommet. LOCKING RIB 5. If a factory grommet is not available, use the provided strain relief: LOCKING a. Choose a location in the trunk compartment as close to the WINDOW radar receiver as possible. LOCKING PIN b. Drill a 1/2” hole into the chosen location for the strain relief. LOCKING RING KEY Do not drill into the trunk until you know GUIDE KEY WAY CAUTION! what is on both sides of the drilling area. LOCKING Watch for cables, spare tires, and gas tank. PIN c. Install the strain relief and tighten the mounting nut securely (see diagram E3) DIAGRAM E2 d. Route the rear radar receiver cable through the strain relief, leaving a little slack in the receiver cable. ROUTE THROUGH VEHICLE MOUNTING NUT e. Tighten the waterproof gasket nut to create a water proof seal. METAL TRUNK 6. Route the rear radar receiver cable through the trunk, into the WATERPROOF GASKET MATERIAL passenger compartment along the driver's side, and under the dash. Connect wires according separately enclosed block TO RADAR DETECTOR wiring diagram. DIAGRAM E3 VOLUME CONTROL MODULE (all MODELS) 1. Choose a mounting location that's accessible to the driver in the dashboard area or in the vehicle's center console that will not obstruct or block any moving parts. ON-OFF/ FILTER ADJUSTMENT Before drilling, make sure there is enough clearance for the VOLUME CAUTION! Volume Control Module behind the chosen mounting location CONTROL MODULE (approximately 3 1/4”). 2. Drill a 5/16” hole. MOUNTING NUTS 3. Mount the Volume Control Module with the lock washer and nuts, and push the LOCK ON-OFF/FILTER WASHER ADJUSTMENT filter and volume adjustment knobs onto the module shaft (see diagram F1). VOLUME KNOB CONTROL KNOB 4. Route the Volume Control Module cable under the dash and connect wires according to the separately enclosed block wiring diagram. DIAGRAM F1