How to create a double exposure style in photoshop
•
0 likes•492 views

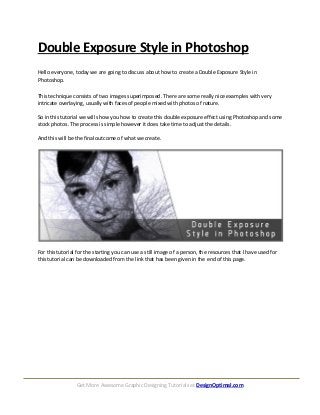
Hello everyone, today we are going to discuss about how to create a Double Exposure Style in Photoshop. This technique consists of two images superimposed. There are some really nice examples with very intricate overlaying, usually with faces of people mixed with photos of nature. So in this tutorial we will show you how to create this double exposure effect using Photoshop and some stock photos. The process is simple however it does take time to adjust the details.

Recommended
Recommended
More Related Content
Recently uploaded
Recently uploaded (20)
Featured
Featured (20)
How to create a double exposure style in photoshop
- 1. Get More Awesome Graphic Designing Tutorials at DesignOptimal.com Double Exposure Style in Photoshop Hello everyone, today we are going to discuss about how to create a Double Exposure Style in Photoshop. This technique consists of two images superimposed. There are some really nice examples with very intricate overlaying, usually with faces of people mixed with photos of nature. So in this tutorial we will show you how to create this double exposure effect using Photoshop and some stock photos. The process is simple however it does take time to adjust the details. And this will be the final outcome of what we create. For this tutorial for the starting you can use a still image of a person, the resources that I have used for this tutorial can be downloaded from the link that has been given in the end of this page.
- 2. Get More Awesome Graphic Designing Tutorials at DesignOptimal.com Step 01 For this I am using a picture of a young and beautiful model, first make a new document of A4 and name it as Double exposure. Psd , secondly open the issued image named as the Model .jpg Model_image
- 3. Get More Awesome Graphic Designing Tutorials at DesignOptimal.com Step 02 Use the pen tool to select the background around the girl and after selecting, right click the pen tool path that you have created and make selection and remove the background. To make the edges smooth use the Refine Edges option. Image-background selection
- 4. Get More Awesome Graphic Designing Tutorials at DesignOptimal.com Image-refine edge This is the way the model image should look like after the refine edge command has given
- 5. Get More Awesome Graphic Designing Tutorials at DesignOptimal.com Step 03 Open the second image that has been issued or the image that named as TreeSilhouette .png. Make a new document drag n drop the TreeSilhouette .png in order to duplicate the tree branches to make it bit more complicated as shown in the next image.
- 6. Get More Awesome Graphic Designing Tutorials at DesignOptimal.com Step 04 Now drag and drop the new complicated tree image into the Double exposure. Psd where the model image is situated. After putting the two images together, Ctrl + Click the top layer where the Tree Silhouette is situated. selecting-the-TreeSilhouette-over-the-model-image
- 7. Get More Awesome Graphic Designing Tutorials at DesignOptimal.com Step 05 Now mask the top tree image to the Model image ( Alt+Ctrl+G ), then it should look as the image shown below image mask
- 8. Get More Awesome Graphic Designing Tutorials at DesignOptimal.com Step 06 To make the image more realistic like it was taken originally from a camera, make the branches of the tree random, especially on the edges and to make them look random and not so uniform (random-_edges). So you’ll have to duplicate the masked tree branch layer around two more times and change the direction and opacity of it and the layer blending option. In this Project : o for duplicate tree branches layer 01 – Opacity is 74% and the blending option is Hard Light o for duplicate tree branches layer 02 – Opacity is 40% and the blending option is Hard Light Also duplicate the girl's layer and move it on top of the other layers. Reduce the opacity to 70% Then the effect would look like the top-layer-model-opacity Random-_edges
- 9. Get More Awesome Graphic Designing Tutorials at DesignOptimal.com Top-layer-model-opacity
- 10. Get More Awesome Graphic Designing Tutorials at DesignOptimal.com Step 07 Now to make some final adjustments for that we will have to adjust the brightness and contrast of the layers by adding an adjustment layer. After changing the values of the Brightness Contrast layer add a photo filter adjustment layer. Change the filter in to the color or filter you like. Mine is cooling filter Blue, now the final Output should look like the image shown below. Final Output
- 11. Get More Awesome Graphic Designing Tutorials at DesignOptimal.com new_adjustment_layer_B&W There now you have successfully completed the tutorial. Thanks for staying with this tutorial. Hope you have enjoyed this, stay tuned for more awesome tutorials from us. Click Here to Get More Awesome Tutorials